When using Power Automate to grant SharePoint permissions, sometimes the out-of-the-box Grant Permissions action does not provide the level of customization needed for the solution. Whenever this is the case, we can utilize the SharePoint REST API to grant custom SharePoint permissions. In this blog post, I’ll be going over how to grant custom SharePoint List-level permissions, Item-Level SharePoint List permissions, and SharePoint Folder-level permissions to SharePoint Groups using Power Automate. This blog post will utilize standard SharePoint Groups and Roles to clearly illustrate the process, but this solution can be configured to utilize custom SharePoint Groups and Roles.
1. Get the Principal ID of the SharePoint Group to which you are granting custom permissions
Typically, the standard SharePoint Groups’ Principal IDs are shown in the table below:
| Standard SharePoint Group | Site Owners | Site Members | Site Visitors |
|---|---|---|---|
| Principle ID | 3 | 5 | 4 |
However, it is still recommended to confirm the Principal IDs of even the standard SharePoint Groups. In the case of a custom SharePoint Group, you must always find the Principal IDs using the following steps, as they do not adhere to out-of-the-box standards.
Finding the Principal ID of a SharePoint Group is very easy if you know the group’s name:
A. Use the Send an HTTP Request to SharePoint action in Power Automate to get the Group’s Principal ID
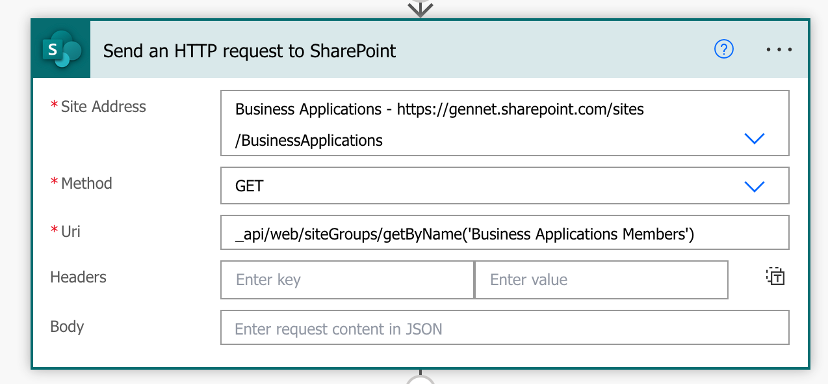
Site address: Your SP Site URL
Method: GET
URI: _api/web/siteGroups/getByName(”)
In my example, I am trying to get the Principal ID of the Business Applications Members SharePoint Group.
B. Use the Parse JSON action to parse the HTTP request’s body
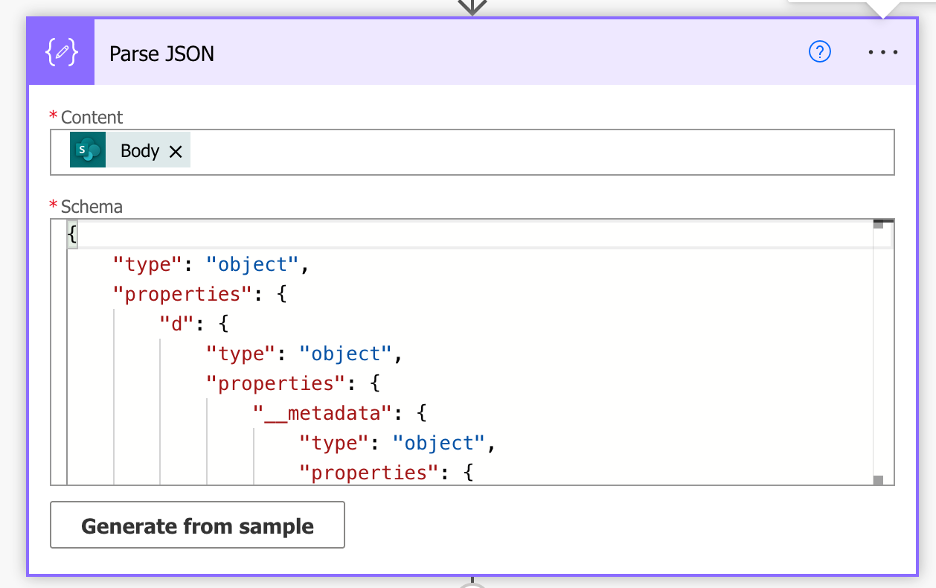
Content:
body(‘Send_an_HTTP_Request_to_SharePoint’)
Schema:
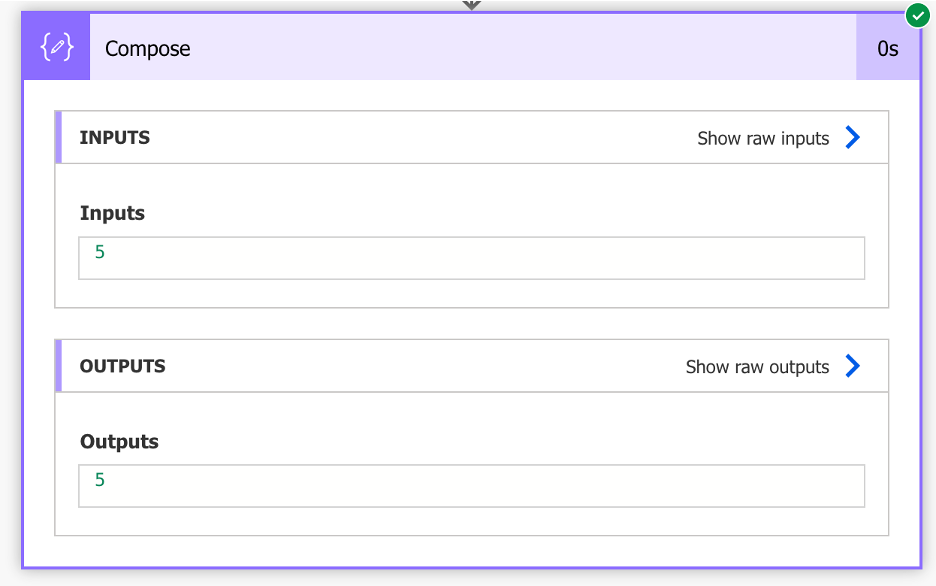
C. Use the Compose action to extract the Principal ID from the JSON output. The Principal ID field is stored in the “Id” field of the JSON schema.

Inputs:
body(‘Send_an_HTTP_request_to_SharePoint’)?[‘d’]?[‘Id’]
The Compose action will output the Principal ID of the target SharePoint Group. In my case, the Principal ID of my target group, Business Applications Members, was 5. Even though I was targeting a standard SharePoint Group, the Site Members group, which typically has a Principal ID of 5, it is always worth going the extra mile to confirm that our expected results match our actual results.
2. Get the Role Definition ID of the SharePoint Role that you will grant to the SharePoint Group
The standard SharePoint Roles’ Role Definition Ids are shown in the table below:
| Role Definition Name | Role Definition ID |
|---|---|
| Full Control | 1073741829 |
| Design | 1073741828 |
| Edit | 1073741830 |
| Contribute | 1073741827 |
| Read | 1073741826 |
| Limited Access | 1073741825 |
| View Only | 1073741824 |
However, it is still recommended to confirm the Role Definition Ids of even the standard SharePoint Roles. In the case of a custom SharePoint Role, you must always find the Role Definition Ids using the following steps, as they do not adhere to out-of-the-box standards.
Finding the Role Definition Id of a SharePoint Role is very easy if you know the role’s name:
A. Use the Send an HTTP Request to SharePoint action in Power Automate to get the Role’s Role Definition Id
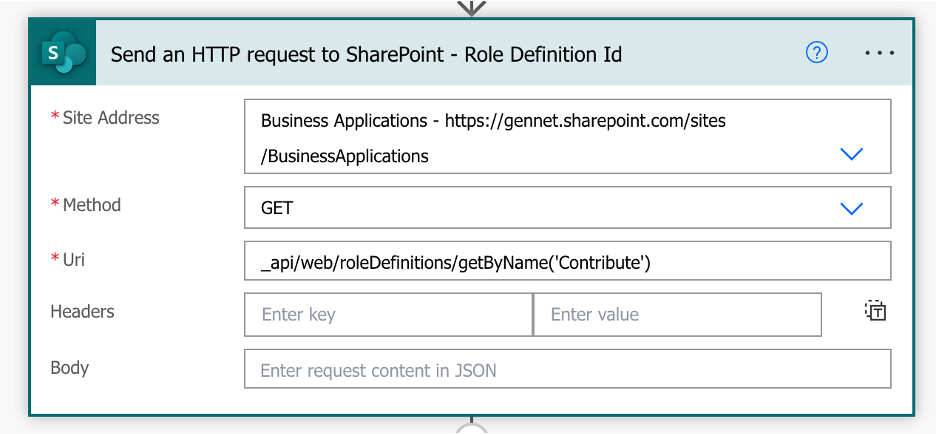
Site address: Your SP Site URL
Method: GET
URI: _api/web/roleDefinitions/getByName(”)
In my example, I am trying to get the Role Definition Id of the Contribute SharePoint Role.
B. Use the Parse JSON action to parse the HTTP request’s body
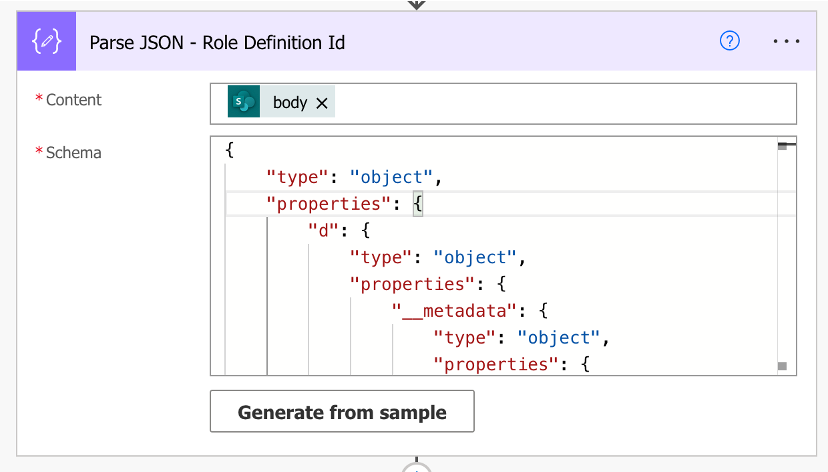
Content:
body(‘Send_an_HTTP_request_to_SharePoint_-_Role_Definition_Id’)
Schema:
C. Use the Compose action to extract the Role Definition Id from the JSON output. The Role Definition Id field is stored in the “Id” field of the JSON schema.
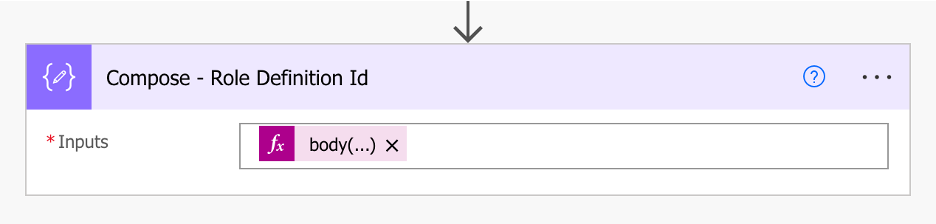
Inputs:
body(‘Send_an_HTTP_request_to_SharePoint_-_Role_Definition_Id’)?[‘d’]?[‘Id’]
![screenshot of Inputs: body('Send_an_HTTP_request_to_SharePoint_-_Role_Definition_Id')?['d']?['Id']](https://compass365.com/wp-content/uploads/2023/04/Grant-Custom-SharePoint-Permissions-8.png)
The Compose action will output the Role Definition Id of the target SharePoint Role. In my case, the Role Definition Id of my target role, Contribute, was 1073741827. Even though I was targeting a standard SharePoint Role, Contribute, which typically has a Principal ID of 1073741827, it is always worth going the extra mile to confirm that our expected results match our actual results.
3. Break the role inheritance of the target SharePoint List, SharePoint List Item, or SharePoint Folder
The next step in this process is to break the role inheritance of the target SharePoint List, SharePoint List Item, or SharePoint Folder. Breaking the role inheritance means that the List/List Item/Folder no longer inherits its permission from its parent.
- For a SharePoint List, the parent is the SharePoint Site.
- For a SharePoint List Item, the parent is the SharePoint List.
- For a SharePoint Folder, the parent is the SharePoint Document Library.
Breaking the role inheritance creates a “clean slate” from a permissions standpoint for the target SharePoint List, List Item, or Folder, which sets the stage for assigning custom permissions afterward.
Break role inheritance of SharePoint List:
A. Use the Send an HTTP Request to SharePoint action in Power Automate to break the role inheritance of the SharePoint List
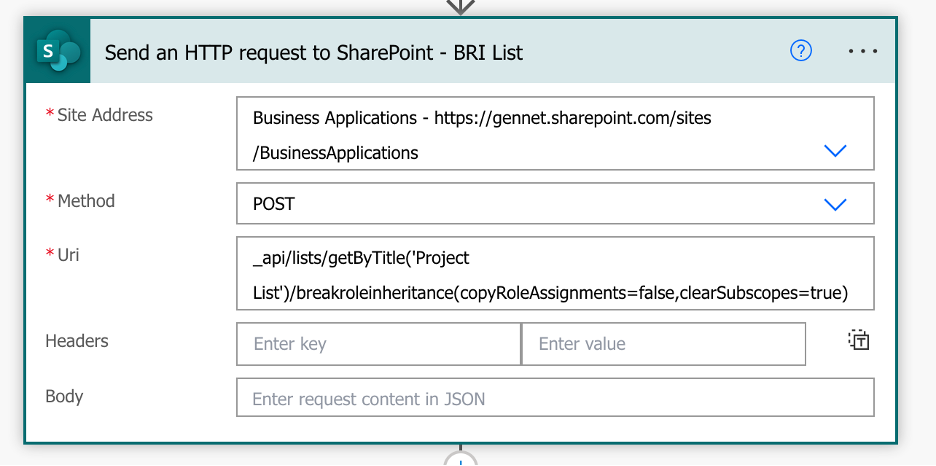
Site address: Your SP Site URL
Method: POST
URI: _api/lists/getByTitle(”)/breakroleinheritance(copyRoleAssignments=false,clearSubscopes=true)
In my example, I am breaking the role inheritance of the Project List SharePoint List within the Business Applications SharePoint Site.
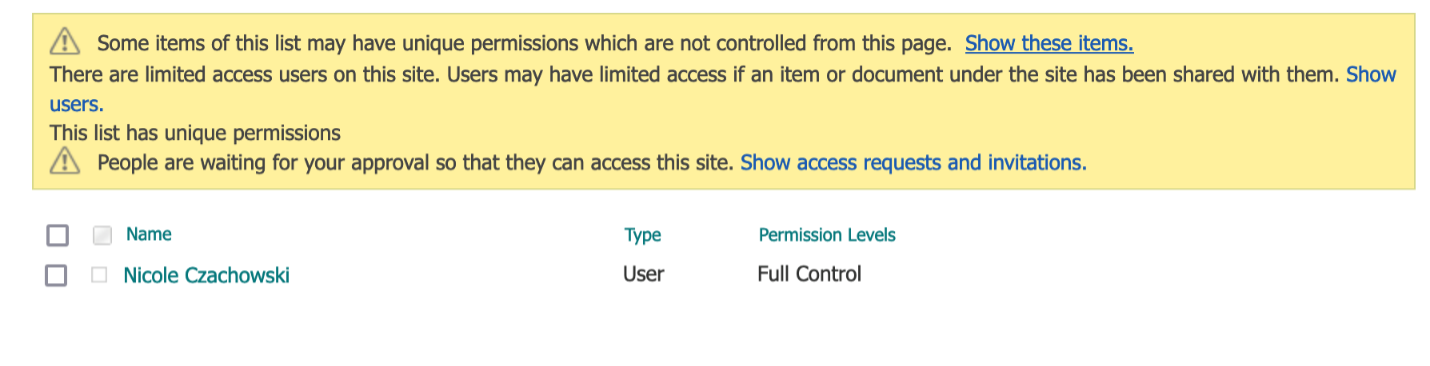
B. To check that the role inheritance was broken successfully, navigate to the target SharePoint List, select the Gear icon, select List Settings, then select Permissions. For this list, the only permissions granted to the list in the current state should be your user with Full Control permissions granted.
Break role inheritance of SharePoint List Item:
A. Use the Get Items action in Power Automate to extract the ID of the target list item
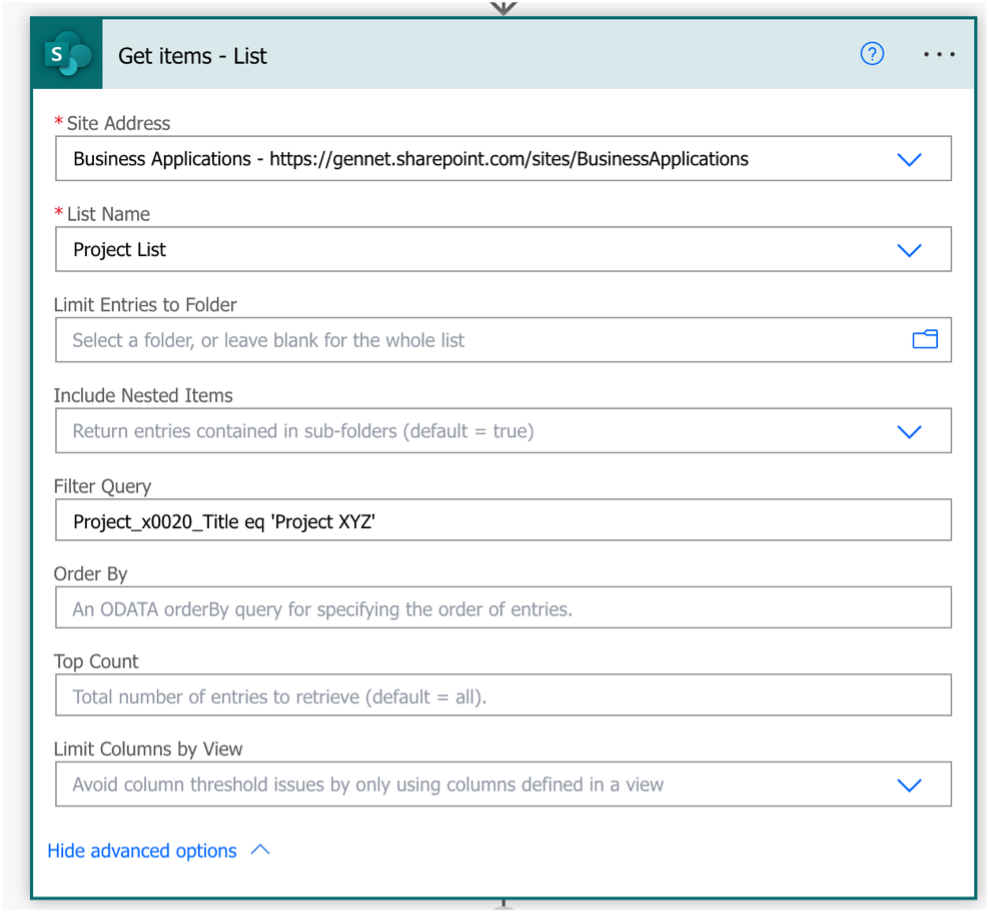
In my example, I am getting the row where the field Project_x0020_Title equals “Project XYZ” from the Project List SharePoint List.
B. Use the Send an HTTP Request to SharePoint action within an Apply to each action in Power Automate to break the role inheritance of the SharePoint List Item
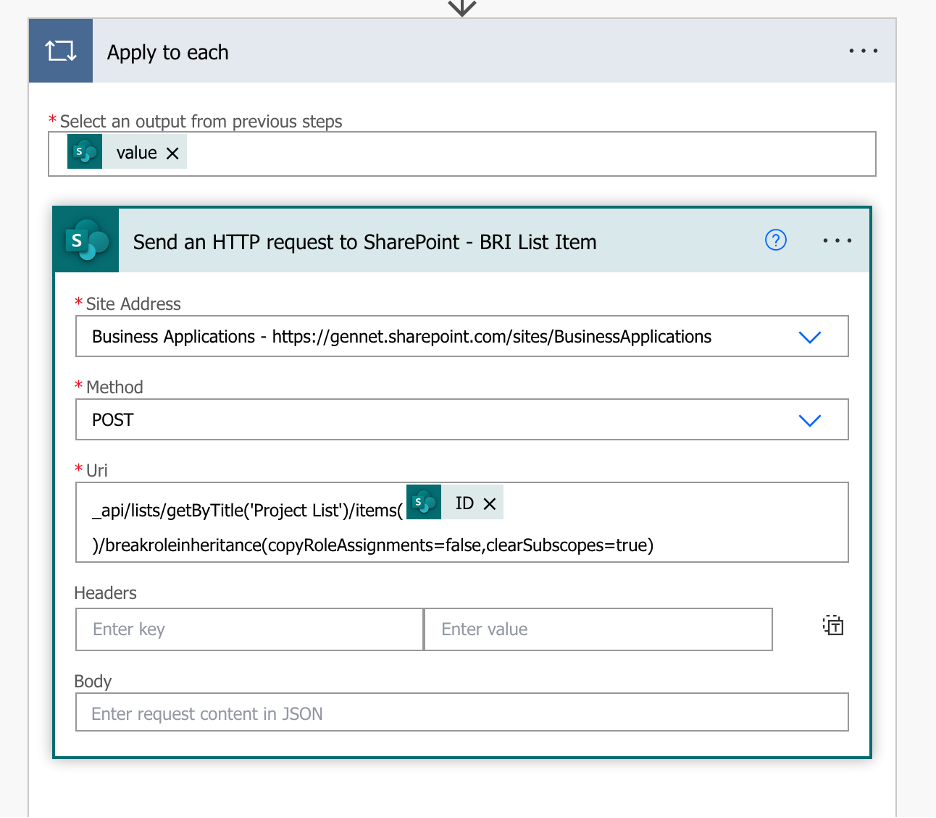
Apply to each input: outputs(‘Get_Items_-_List’)?[‘body/value’]
Site address: Your SP Site URL
Method: POST
URI: _api/lists/getByTitle(”)/items()/breakroleinheritance(copyRoleAssignments=false,clearSubscopes=true)
Where the dynamic expression for the List Item’s ID is: items(‘Apply_to_each’)?[‘ID’]
In my example, I am breaking the role inheritance of a specific Project List SharePoint List list item within the Business Applications SharePoint Site.
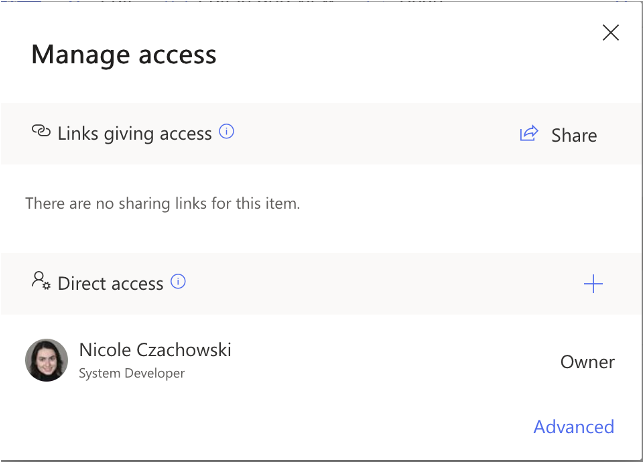
C. To check that the role inheritance was broken successfully, navigate to the target SharePoint List, select the target list item, then right click and select Manage Access. The only permissions in the Manage Access pane should be your user with Full Control.
Break role inheritance of SharePoint Folder within a Document Library:
A. Use the Send an HTTP Request to SharePoint action in Power Automate to break the role inheritance of the SharePoint Folder

Site address: Your SP Site URL
Method: POST
URI: _api/web/GetFolderByServerRelativeUrl(‘/ ‘)/ListItemAllFields/breakroleinheritance(copyRoleAssignments=false, clearSubscopes=true)
In my example, I am breaking the role inheritance of the Test SharePoint folder within the General folder, which is within the Shared Documents Library of the Business Applications Site.
B. To check that the role inheritance was broken successfully, navigate to the target SharePoint Folder and select it, then right click and select Manage Access. The only permissions in the Manage Access pane should be your user with Full Control.
4. Grant permissions to the target SharePoint List, SharePoint List Item, or SharePoint Folder
The final step of this process is to grant permissions to the target SharePoint List, SharePoint List Item, or SharePoint Folder. We will be using the Principal ID of the SharePoint Group from Step 1. Along with the Role Definition Id of the SharePoint Role from Step 2.
Grant permissions to SharePoint List:
A. Use the Send an HTTP Request to SharePoint action in Power Automate to grant permissions to the SharePoint List
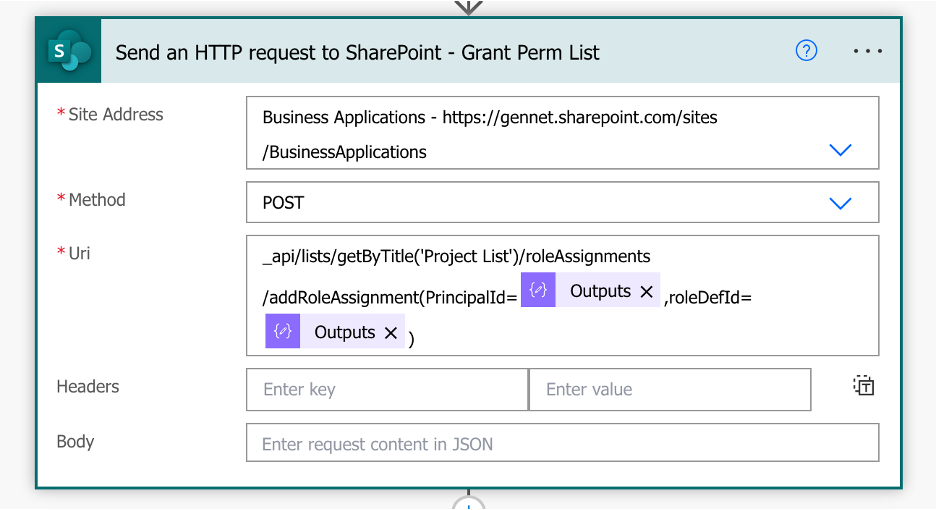
Site address: Your SP Site URL
Method: POST
URI: _api/lists/getByTitle(‘’)/roleAssignments/addRoleAssignment(PrincipalId=,roleDefId=)
Where the dynamic expression for the Principal ID is the output of our Compose action in Step 1C: outputs(‘Compose’) and the dynamic expression for the Role Definition Id is the output of our Compose action in Step 2C: outputs(‘Compose_-_Role_Definition_Id’)
In my example, I am granting the Contribute Role (Role Definition Id: 1073741827) to the Business Applications Members Group (Principal ID: 5) for the Project List SharePoint List.
B. To check that the permissions were granted successfully, navigate to the target SharePoint List, select the Gear icon, select List Settings, then select Permissions. For this list, the target SharePoint Group should now have the target SharePoint Role, in addition to your user having Full Control. In my example, Business Applications Members now have the Contribute Role and I have Full Control.

Grant permissions to SharePoint List Item:
A. Use the Send an HTTP Request to SharePoint action within an Apply to each action in Power Automate to grant permissions to the SharePoint List Item
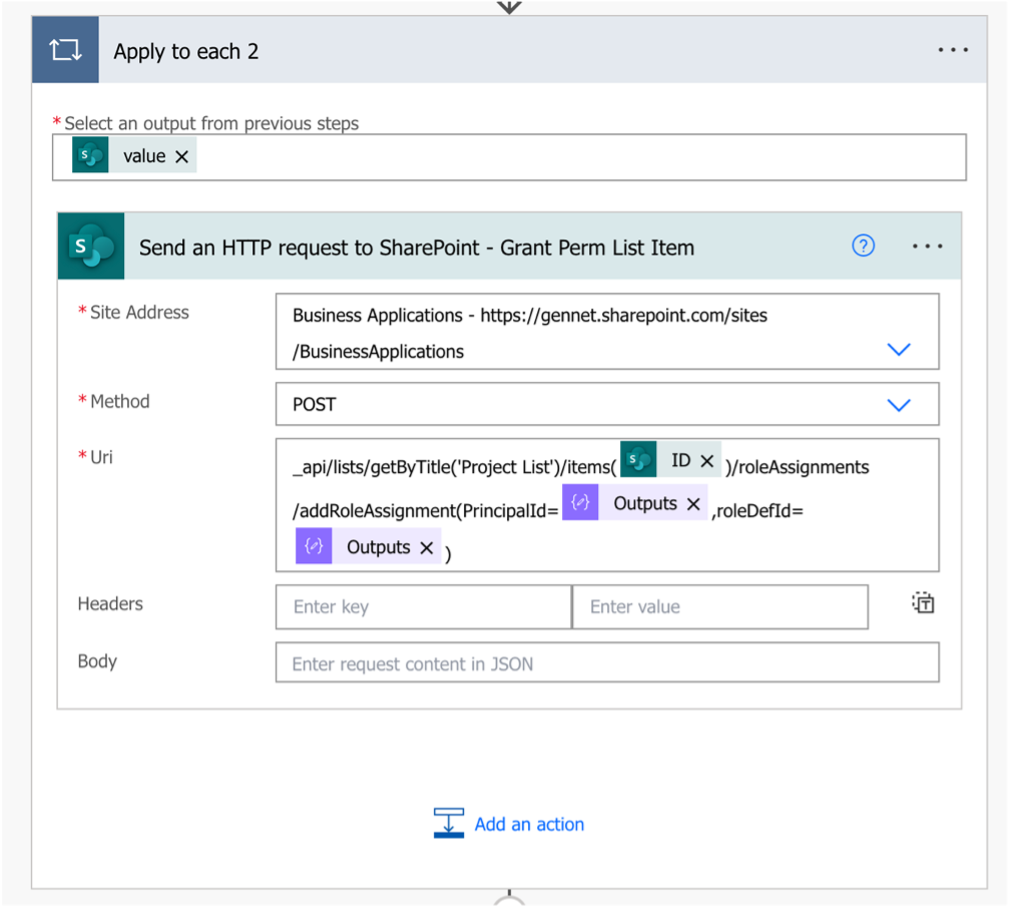
Apply to each input: outputs(‘Get_Items_-_List’)?[‘body/value’]
Site address: Your SP Site URL
Method: POST
URI: _api/lists/getByTitle(”)/items()/roleAssignments/addRoleAssignment(PrincipalId=,roleDefId=)
Where the dynamic expression for the List Item’s ID is: items(‘Apply_to_each_2’)?[‘ID’], the dynamic expression for the Principal ID is the output of our Compose action in Step 1C: outputs(‘Compose’), and the dynamic expression for the Role Definition Id is the output of our Compose action in Step 2C: outputs(‘Compose_-_Role_Definition_Id’)
In my example, I am granting the Contribute Role (Role Definition Id: 1073741827) to the Business Applications Members Group (Principal ID: 5) to a specific list item within the Project List SharePoint List.
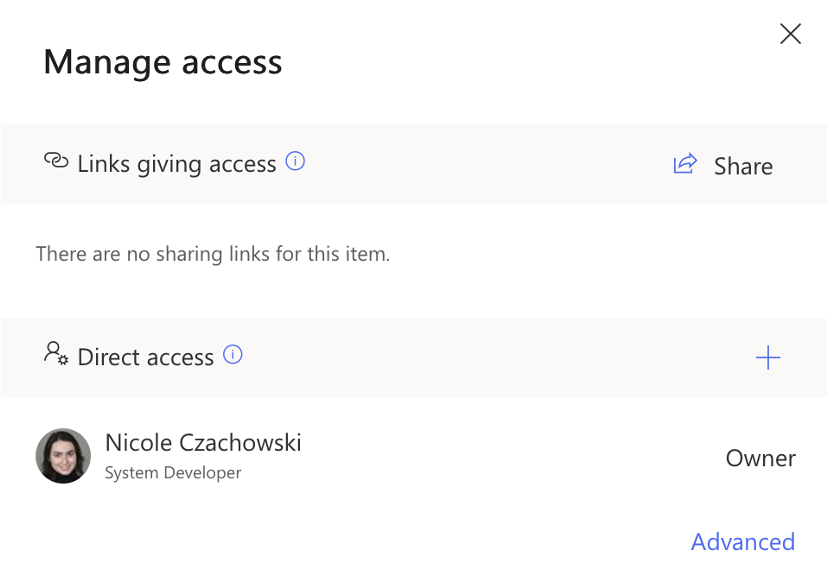
B. To check that the permissions were granted successfully, navigate to the target SharePoint List, select the target list item, then right-click and select Manage Access. The permissions in the Manage Access pane should be the target SharePoint Group with the target SharePoint Role and your user with Full Control. In my example, Business Applications Members now has the Contribute Role (designated by the pencil icon) and I have Full Control.

Since the Manage Access Pane does not explicitly state the target SharePoint Role given to the target SharePoint Group and instead represents it with generic icons, select Advanced in the lower right corner of the Manage Access pane to view the explicitly stated permissions for this list item.

As we can see in the above screenshot, the target SharePoint Group, Business Applications Members, was granted the target SharePoint Role, Contribute, for this list item.
Grant permissions to SharePoint Folder within a Document Library:
A. Use the Send an HTTP Request to SharePoint action in Power Automate to grant permissions to the SharePoint Folder
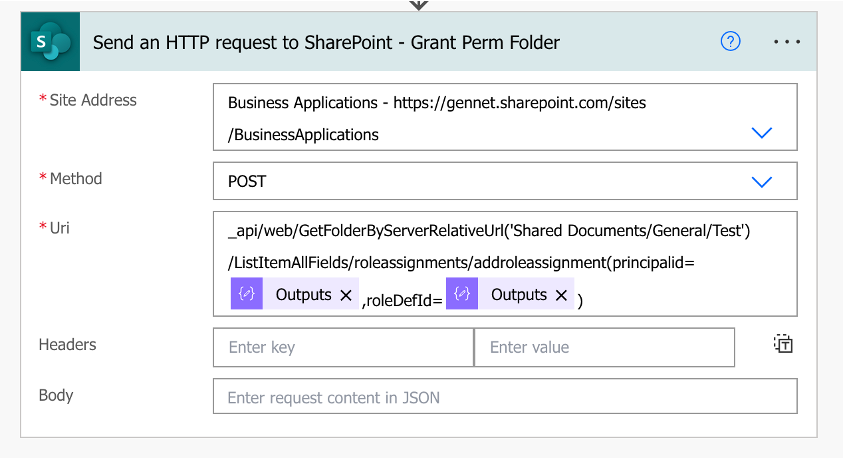
Site address: Your SP Site URL
Method: POST
URI: _api/web/GetFolderByServerRelativeUrl(‘/’)/ListItemAllFields/roleassignments/addroleassignment(principalid=,roleDefId=)
Where the dynamic expression for the Principal ID is the output of our Compose action in Step 1C: outputs(‘Compose’) and the dynamic expression for the Role Definition Id is the output of our Compose action in Step 2C: outputs(‘Compose_-_Role_Definition_Id’)
In my example, I am granting the Contribute Role (Role Definition Id: 1073741827) to the Business Applications Members Group (Principal ID: 5) for the Test SharePoint folder within the General folder, which is within the Shared Documents Library of the Business Applications Site.
B. To check that the permissions were granted successfully, navigate to the target SharePoint Folder and select it, then right-click and select Manage Access. The permissions in the Manage Access pane should be the target SharePoint Group with the target SharePoint Role and your user with Full Control. In my example, Business Applications Members now has the Contribute Role (designated by the pencil icon) and I have Full Control.

Since the Manage Access Pane does not explicitly state the target SharePoint Role given to the target SharePoint Group and instead represents it with generic icons, select Advanced in the lower right corner of the Manage Access pane to view the explicitly stated permissions for this folder.

As we can see in the above screenshot, the target SharePoint Group, Business Applications Members, was granted the target SharePoint Role, Contribute, for this folder.
Conclusion
We have now demonstrated how to grant custom SharePoint permissions using the SharePoint REST API in Power Automate for 3 situations: SharePoint Lists, SharePoint List-Items, and SharePoint Folders. With only a few simple steps in Power Automate, a new level of SharePoint permission customization and flexibility is unlocked.
If you are new to the low code/pro code approach using the Power Platform and would like assistance, reach out at any time to discuss Compass365’s Power Platform Consulting Services We are happy to help. Contact us to arrange for a complimentary consultation.
Compass365, a Microsoft Gold Partner, delivers SharePoint, Microsoft Teams, and Power Platform solutions that help IT and Business leaders improve the way their organizations operate and how their employees work.