Bring your Intranet and Microsoft Teams Together with Viva Connections
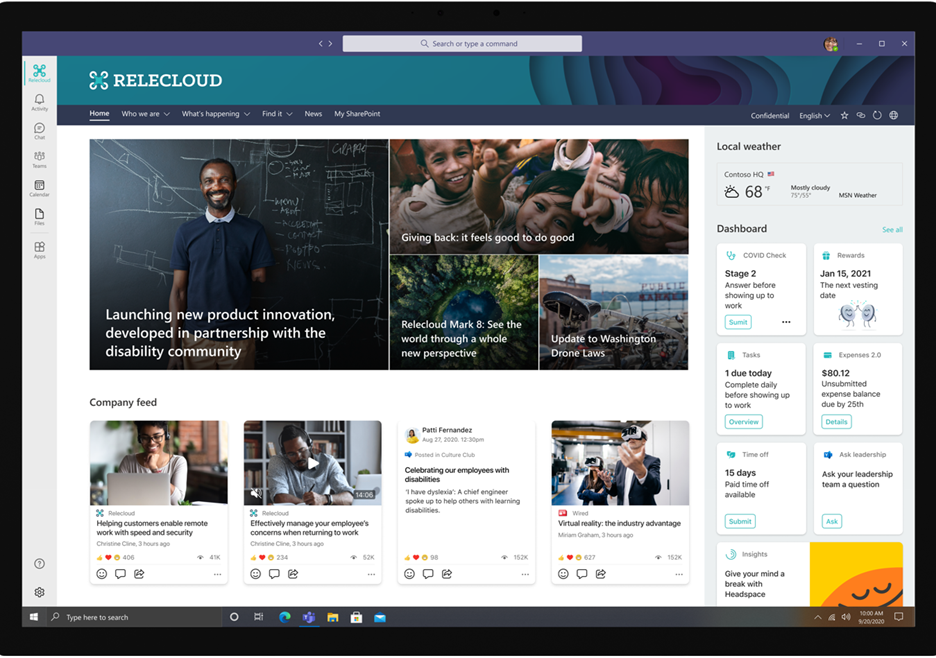
As more and more people use Microsoft Teams within organizations, a new frequently asked question has surfaced – how do we incorporate our Intranet into Teams? That question makes sense. As of March 2021, the number of daily active users of Microsoft Teams hit 145 million! Employees spend a significant portion of their daily lives working with each other in Teams. They collaborate, meet, chat, and consume Teams sites, channels, and files. But the interactions focus on small groups or subsets of people within the larger organization. The experience is devoid of more global organization-to-employee communication that flows through traditional intranet sites. Enter Viva Connections, one of four pillars of the new Microsoft Employee Experience. As described on the Viva site, Viva Connections amplifies culture and communications. It provides a gateway to surface intranet-based communications within Microsoft Teams to keep employees engaged and informed about what’s happening globally within your organization – right where they are spending most of their day interacting with colleagues.
Now that you understand why Viva Connections exists, the question turns to how do you establish the connection between your Teams collaboration platform and your SharePoint communications platform, and who does it involve?
Overall, the process to establish the connection between Teams and your SharePoint intranet is simple. You create and configure a Teams app then deploy it to your Teams environment so that your Intranet becomes available at the push of a button within the Teams client. What’s complex about this process are the layers and roles that participate – especially in larger organizations where the responsibilities of managing and maintaining your Microsoft tenant and services are typically divided among many people or teams. To add to this, the process requires the use of PowerShell and the SharePoint Management Shell, a pair of technologies that make some administrators nervous because they spend most of their time working with nice visual user interfaces rather than command-line driven interfaces. So, let’s break down the process into the participating roles and respective tasks, remembering that in smaller organizations it is typical for employees to serve in more than one technical role.
Roles and Task Involved in Configuring Viva Connections
Step |
Role |
Tasks |
|---|---|---|
1 |
SharePoint Administrator, Site Owners, and Stakeholders |
|
2 |
Visual Designer |
|
3 |
Legal Team and Web Administrator |
|
4 |
SharePoint Administrator |
|
5 |
Communications and SharePoint Teams |
|
6 |
Teams Administrator |
|
7 |
Communications Team |
|
Step-By-Step Guide to Configure Viva Connections
Step 1: Identify SharePoint Intranet Home Site
Step 1 requires that key Stakeholders and Site Owners identify a single Communication site as the SharePoint Intranet Home site – the main landing site that brings together news, events, etc. within your organization. Once identified, the SharePoint Administrator uses PowerShell to execute a simple command. The configuration is quick – a few minutes in our experience, but Microsoft documentation notes it can take a couple of hours to complete.
Reference: Set a site as your home site – SharePoint in Microsoft 365 | Microsoft Docs
Step 2: Create Icons
Step 2 requires that a Visual Designer or someone handy with a graphics tool create the icons for the Teams app and interface. Specifically, you need two PNG icons: a 192 x 192 px color icon for the Teams App catalog and a 32 x 32 px monochrome icon for the Teams app bar. You’ll find best practices for creating these icons in the reference below.
Reference: Package your app – Teams | Microsoft Docs
Step 3: Develop Terms and Conditions and Privacy Policy Statements
Step 3 in the process involves your Legal team and a web admin. Your legal team either reviews and accepts Microsoft’s default Terms and Conditions and Privacy Policy or drafts your own Teams app Terms and Conditions and Privacy Policy statements and sends them to a web admin for publishing. The web admin then publishes these documents to a public website for reference from your Teams app and passes along the published URLs to your SharePoint Administrator.
Reference: Add Viva Connections desktop to Microsoft Teams – SharePoint in Microsoft 365 | Microsoft Docs
Step 4: Create the Viva Connections App
Step 4 requires that your SharePoint Administrator create your organization’s Viva Connections for desktop app using the SharePoint Management Shell and PowerShell text-based script wizard. Your SharePoint Administrator will find the script and script questions in the links below. The key here is to have the following ready:
- Answers for each script question
- URLs from Step 3 to the Terms and Conditions and Privacy Policy web pages
- The two PNG icons from Step 2
Reference:
- Download Viva Connections for Teams desktop from Official Microsoft Download Center
- Add Viva Connections desktop to Microsoft Teams – SharePoint in Microsoft 365 | Microsoft Docs
Step 5: Prepare Documentation for Users
Step 5 involves the Corporate Communications Team and SharePoint Team working together to prepare documentation for users on the change they should expect to see in Microsoft Teams. Depending on the organization, this could be as simple as an email describing the rollout of Viva Connections with some screenshots, so users know what to expect but more importantly how to find/use the Intranet from within Teams.
Step 6: Upload Viva Connections App to Microsoft Teams
Step 6 requires a Teams Administrator to take the Viva Connections app generated in Step 4 and upload it into the Microsoft Teams Administration interface. In short, the new app is uploaded to Teams apps > Managed apps. Once uploaded, the new app is either added to the Global policy or a new app policy, and the app is pinned to reflect where the Viva Connections app should display in the Teams bar.
Reference:
- Upload your custom apps in the Microsoft Teams admin center – Microsoft Teams | Microsoft Docs
- Manage app setup policies in Microsoft Teams – Microsoft Teams | Microsoft Docs
Step 7: Viva Connections Go Live and Announcement
Step 7 takes your final Viva Connections configuration live as the Communication Teams announces the change to the organization and accompanies the announcement with the documentation created in Step 5.
Does the process still seem confusing, daunting, or intimidating?
Let us help. We can walk your organization through the process, answer questions, and provide guidance for a successful Viva Connections implementation. The experts at Compass365 can also help you create a modern, dynamic intranet to communicate with your employees. Please reach out to Steve Hong, shong@compass365.com at any time.